Happy new year everyone! (yes its a late greeting lmao)
Anyways, 2 weeks ago on 24th Dec 2021, NASA launched the James Webb Space Telescope (JWST), to capture the faintest of light sources in the night sky and help us better understand the universe.
I'm sure everyone has heard of it, or even watched videos about it online 👀👀
There's a lot of sciency stuff to be talked about for the JWST, but in this blog we'll be focusing on its trajectory, and also dive head first deep into the physics governing Lagrange Points!
The Lagrange points gang
For people who've watched YouTubevideos about it, you've definitely heard of the term "Lagrange Point L2" before - I certainly have.
I've heard of it previously, but never really thought about why it was so - like the whole concept is just SO MAGICAL.
Basically, Lagrange points are points in space where stuff can just "chill" there and orbit together with Earth around the Sun.
There are 5 such points for ANY 2 bodies in orbit, and JWST is currently heading over to the Earth-Sun orbit's L2 point.
Many space probes have also been sent here in the past, too.
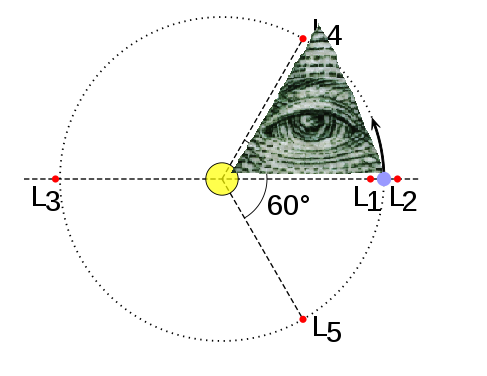
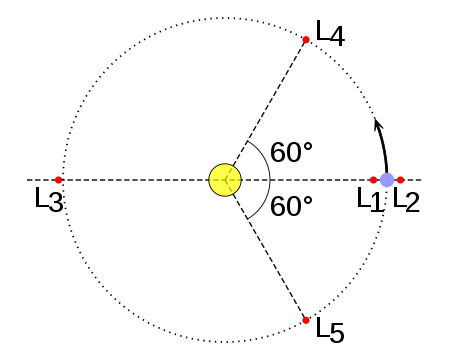
The points L1, L2 and L3 are all on the same Earth-Sun line, and are considered unstable points.
The L4 and L5 points form equilateral triangles with the Earth and the Sun, and are considered stable points.
Stability
Think of their stability like this: a ball can be balanced on top of a hill, but even the slightest gust of wind will blow it down the hill, making the hilltop be in an unstable equilibium.
However, if you put the ball at the bottom, letting it sit in a pit somewhere, it would be hard to get it out without external force - this would be a stable equilibium.
Beacuse the L4 and L5 points are stable, many asteroids naturally clump together here (like how balls naturally roll downhill).
These asteroids are called Trojan asteroids.
Jupiter is famous for having tons of these. (the green ones)
Conversely, since L1, L2 and L3 are unstable points, no asteroids are there (but stuff that stays there will still be in equilibium too)
Since L3 is so far away from the Earth and the Sun, things at the L3 point, although able to "chill" there, are easily influenced by other stuff in the Solar System, and get pulled away easily.
And for the L1 and L2 points, they are the choices for launching space probes, as mentioned previously! This is because they are:
close to Earth
far away from asteroids which can crash into them
side note: JWST orbits around the L2 point in a "halo orbit", which basically means it's periodic. (some orbits are not usually periodic though!)
Point L1, the point between 2 worlds
The L1 point is between the Sun and Earth, being pulled by both celestial bodies which fix it in place.
It would have the same orbital period as the Earth (meaning it orbits along with Earth):
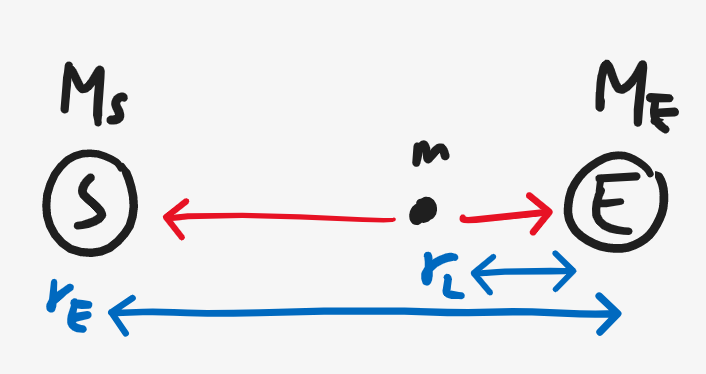
Here's a diagram for the L1 point:
Here, little m denotes a "test mass", just like "test charges" when taught in the context of Electricity / Magnetism. Don't worry about it too much though, as you'll see later that the final result won't depend on this m anyways.
Now, our problem is: how do we find the length rL?
From high school, we know that anything in circular motion MUST have a centripetal force: that means that both the Sun and Earth's gravitational pull are making up the centripetal force for something orbiting at L2:
Firstly, we can equate the centripetal force to the resultant force of gravity on the test mass:
Fsun−Fearth=Fcentripetal
Then, we can substitute their corresponding equations in:
For Earth, this value would turn out to be around: rL1≈1.5⋅106km .
Point L2, the dark twin of L1
Point L2 is also pulled by both the Sun and the Earth, but in another location - it's kind of like it's about to escape, but the Sun and the Earth are pulling it back, so it stays there orbiting.
The setup is similar to the L1 case, but both the Sun and the Earth are conspiring to hold the test mass back:
Fsun+Fearth=Fcentripetal
The derivation is then literally the same as the L1 point:
Also, note that this would be on the other side of the moon ( rL2≈1.5⋅106km , while the Earth-Moon distance is 3.844⋅105km )
This makes it the choice for JWST, as it needs to shield itself from the Sun's rays so it has both the Earth and the Moon on its back.
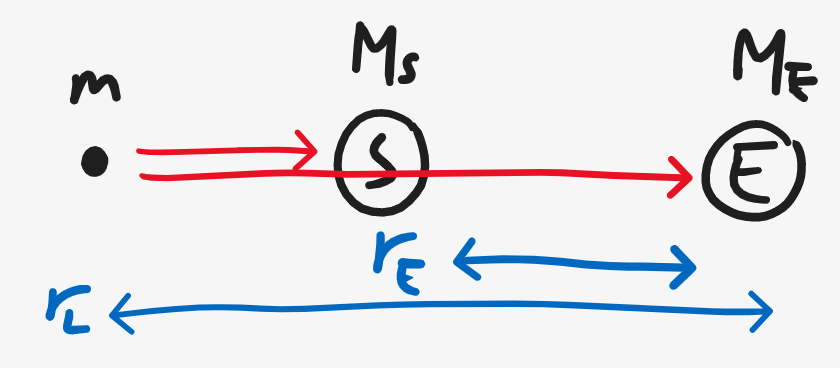
Point L3, the loner
As stated previously, L3 is kind of useless because of how far away it is, but some have said that it could be used as a station to detect solar flares and predict solar events before they happen 👀🔥
The equation we have is the exact same as L2, but accounting for a different length now:
(rL−rE)2GMSm−rL2GMEm(rL−rE)2GMS−rL2GME(rL−rE)2GMS−rL2GME=rL−rEm⋅T24π2(rL−rE)2=T24π2(rL−rE)=rE3GMS(rL−rE), by Kepler’s 3rd law
Frankly, I was stuck when I got to this point. I couldn't use the binomial approximation as before, as in this setup, rErL would not be small.
Instead, I tried rearranging some stuff around:
Holy smokes, we've turned our problem into a quintic equation!
But it's alright: we could use an approximation and solve for the roots by factoring.
Since ME<<MS, MSME<<1, effectively 0.
Hence,
y2y2(1−(y−1)3)≈y2(y−1)3≈0
We get y2=0 (which we'll ignore), and (1−(y−1)3)=0 . Simplifying, we get:
(y−1)3yrErLrL≈1≈2≈2≈2rE
This means that L3 is twice as large as rE, and thus is directly opposite the Earth, forever invisible to us Earth dwellers.
Illuminati confirmed? Points L4 and L5
??? Δ ???
In all seriousness though, the points L4 and L5 are harder to prove. To understand them better, we need to think more.
Like literally more, 1 more specifically. Enter: the restricted 3 body problem
The restricted 3 body problem
So far we've been thinking about the Sun as one big stationary mass, with the Earth orbiting around it. This is called a "one body model", or a "central-force problem".
But this is not the case! In reality, the Sun also moves a little too, due to all the forces acting on it.
By considering ONLY the Earth and the Sun, this would become a "2-body problem".
Similarly, since we are treating the Lagrange points as test masses m, our problem is actually a "3-body problem", and these are notoriously hard to solve.
But since the test mass m is super tiny, this becomes a restricted 3 body problem, of which a solution can be found easily.
In this restricted 3 body problem, we neglect any influences the test mass would have on the Sun / Earth, and effectively turn this into a 2 body problem.
Barry's center
In a 2 body system, the common point where these celestial bodies orbit about is called a barycenter, aka the center of mass.
Isn't it satisfying to see their elegant dances around each other?
Since the barycenter is a center of mass, we can find the length of rCS and rCE by scaling rE according to their masses:
rCS=rE⋅MS+MEME
rCE=rE⋅MS+MEMS
In cases L1, L2 and L3, because we were considering points on the Earth-Sun line, the barycenter lied on top of the line, and so they orbited around it anyways.
For the L4 and L5 points however, since they are not on the Earth-Sun line, we will have to account for this in the following calculations and note that they orbit around the barycenter, which is where things start spicing up.
With this idea in mind, we can start proving that L4 and L5 points form equilateral triangles.
Proving Illuminati
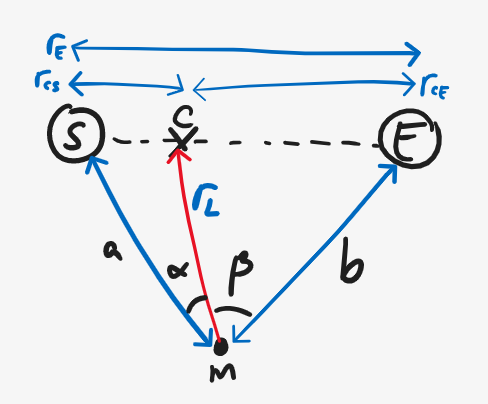
First, we need a diagram.
Let's imagine the test mass was somewhere out there in space. We'll denote its distance to the Sun and Earth a and b respectively.
By proving that a and b are equal to rE , we can show that they form an equilateral triangle. (scroll down for a tl;dr if math scares you)
Now we can start getting our hands dirty. Let's consider the test mass m and the Earth.
Because the L4 and L5 points orbit together with the Earth, their orbital periods have to be the same. Using vt=2πr , we get:
So we've now got an equation relating their velocities and radii... but we don't want velocities! We just want to find their radii, so we need to do some MATH.
Specifically, we're going to find 2 other equations with vE and vL to use, so that we can eliminate them in the equation above. (think simultaneous equations)
One way we could do that is by considering their centripetal forces - and equate them with the forces constituting their gravitational attraction.
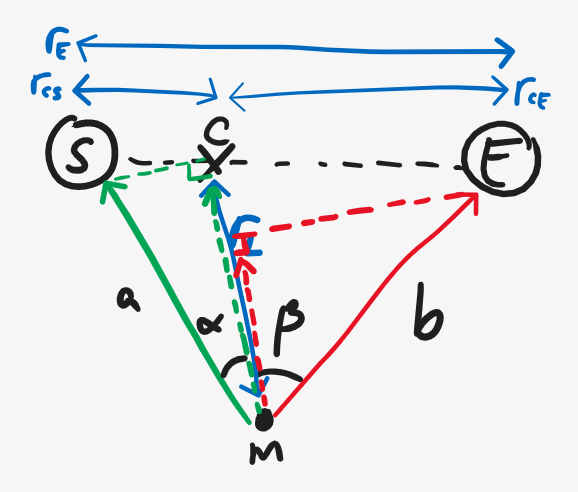
For the test mass m at the Lagrange point, because it's being pulled by both the Earth and the Sun, we must break both gravitational forces into their components, so let's add some angle labels in our diagram:
Then, since the gravitational force makes up the centripetal force for the Lagrange point, we can find an equation for the test mass' centripetal force:
Phew! That was a lot to unpack, hope you're still doing fine! We're almost at the end.
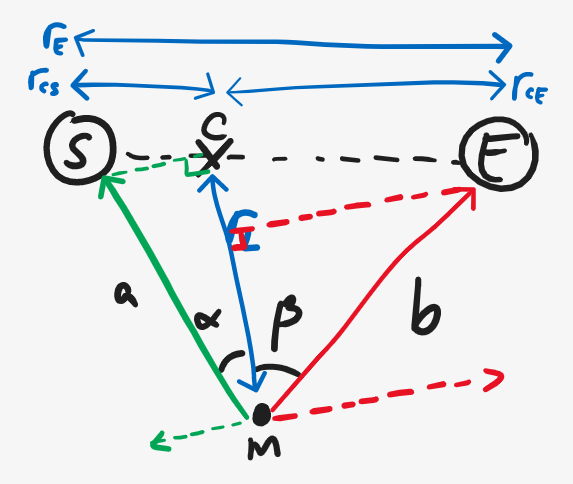
One more thing to note is that for the test mass to be at equilibium, it should NOT be moving horizontally - this means that the other components of the gravitational force should cancel out, i.e.:
One last step! We'll use the sine rule again to find sinLsinE :
From ΔSEL,rEsinLsinLsinE=asinE=rEa
Putting that into equation (9) yields:
a2rE2a2rE2a3a=sinLsinE=rEa=rE3=rE
Isn't that neat?! All that junk from earlier... all those conditions we imposed for the test mass to be at equilibium... produces this simple fact about the system!!
Throughout this process we've only considered the test mass and the Earth - if we were to consider the Sun, we'd get b=rE too! (source: trust me bro), and this concludes our derivation for the L4 and L5 points.
tl;dr: For an arbitrary point in space orbiting around a common barycenter with the same period as the Earth, it would have to be as far to the Sun and Earth as the Earth is to the Sun, aka form an equilateral triangle!
Conclusion
To recap, we've looked at Lagrange points: what they are, and how they were derived.
It's just crazy to think that things can orbit around empty space, being held in place by stuff in this vast universe.
And even crazier is that we can deduce them from Earth, by using only math and physics!
This is why I love these 2 subjects - take the L4 and L5 points for example. We've only applied some conditions for equilibium, and we've then gotten statements that MUST be true for that to occur.
Anyways, thanks for sticking with me till the end! Feel free to send me any feedback, I'll try to improve!! ( ̄︶ ̄)↗ <3

 Here, little
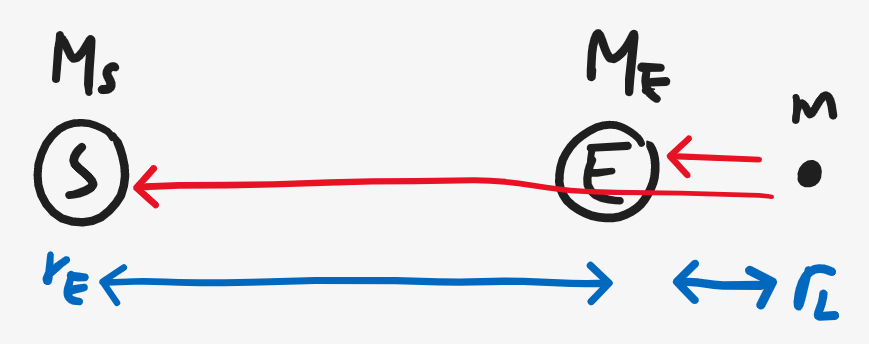
 ??? ???
 Isn't it satisfying to see their elegant dances around each other?
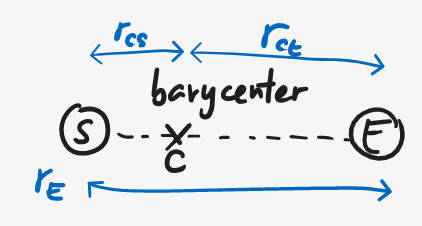 Since the barycenter is a center of mass, we can find the length of and by scaling according to their masses:
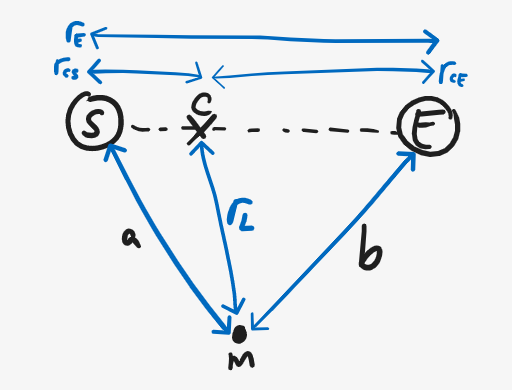 By proving that and are equal to , we can show that they form an equilateral triangle. (scroll down for a tl;dr if math scares you)